


The Chef: Jen Demarest, Baker & Cook
Jen Demarest is the baker behind Sonoma’s Baker & Cook — her husband Nick is the cook, and their daughter Annabelle hosts at the popular cafe, nestled in a shopping center just east of downtown. Baker & Cook recently began offering three-course dinners on Friday and Saturday nights in addition to their popular breakfast and lunch service.
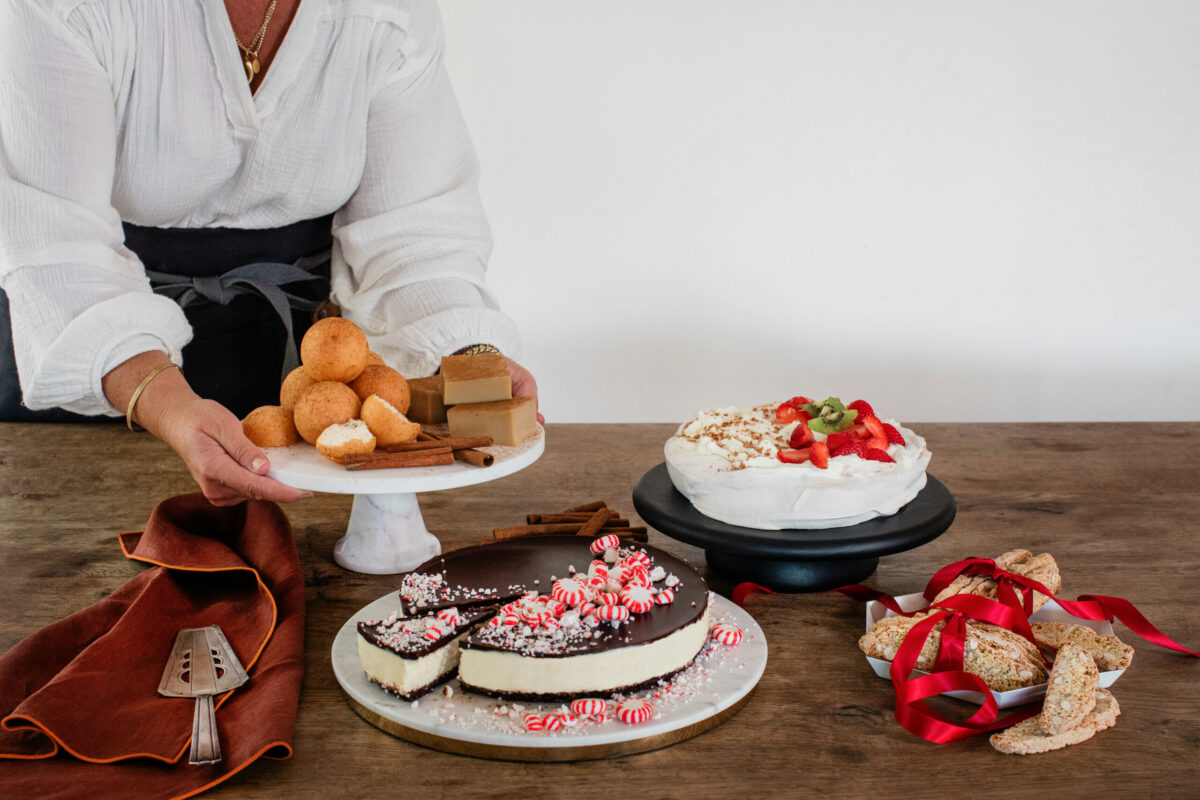
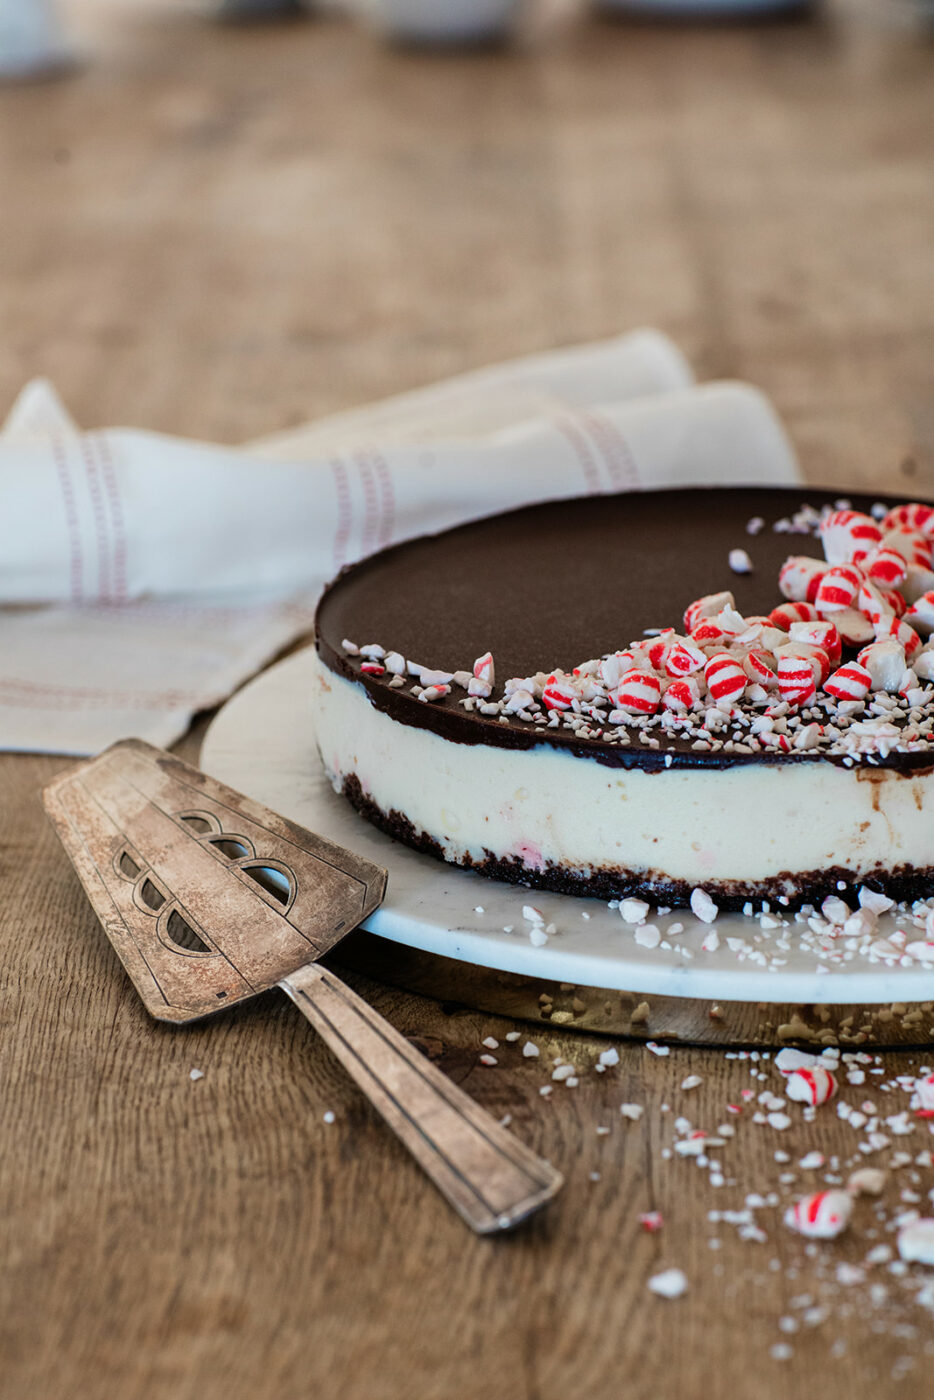
Demarest says her white chocolate peppermint cheesecake draped in dark chocolate ganache is inspired by her first restaurant job as a high schooler in upstate New York. “They had peppermint-stick ice cream and a vat of hot fudge, so at the end of a shift, that was a really great snack. It just became something I needed to have every holiday season.”
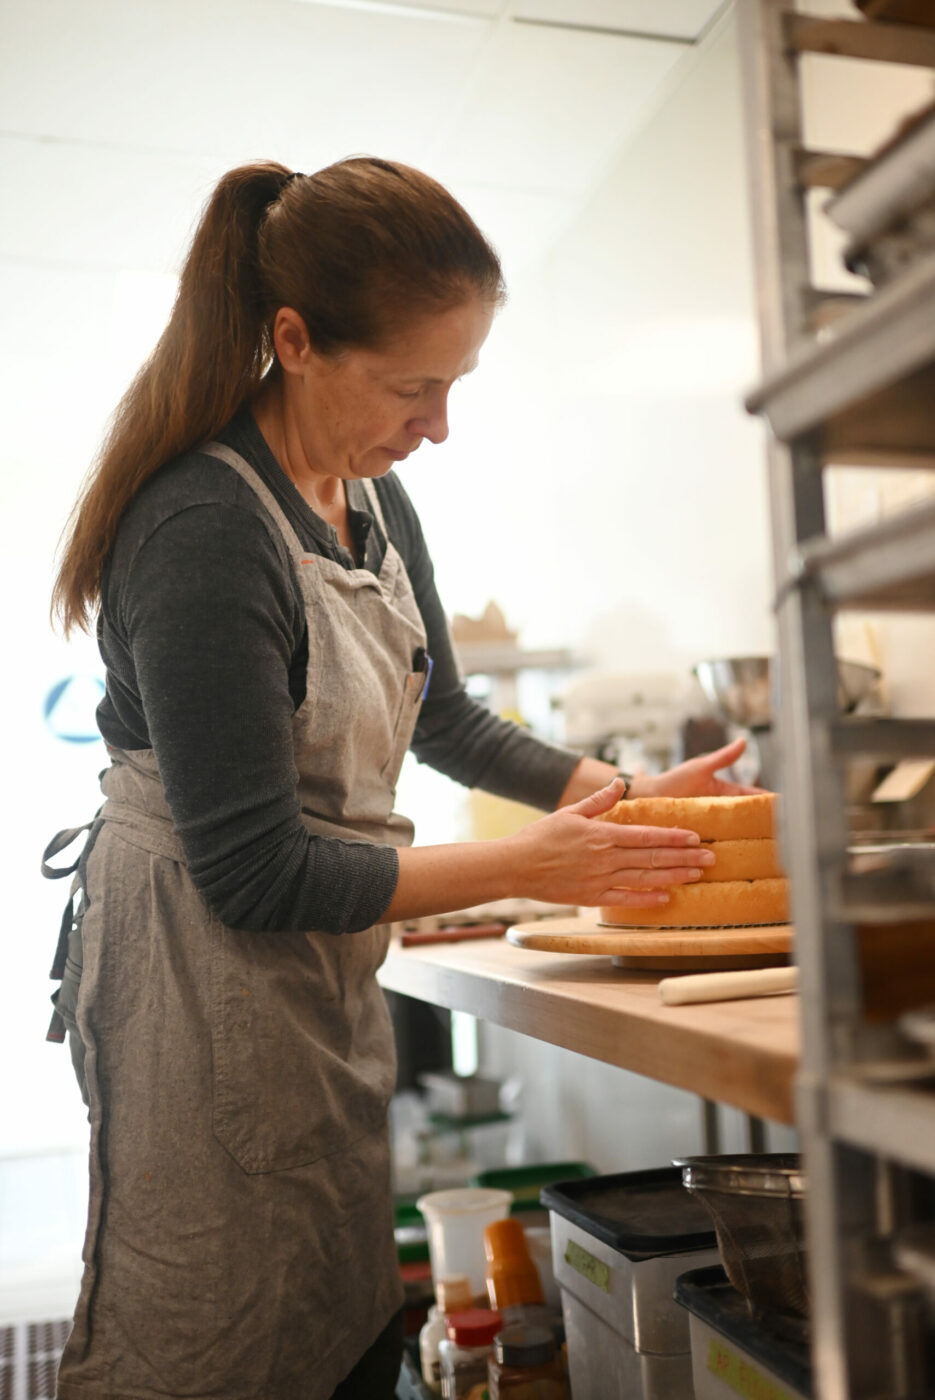
Her tips for a perfect cheesecake include using a water bath and a slow, gentle bake. “The key to a nice silky texture is not overbaking it. You want to leave just a little bit of wiggle in the middle.” In addition to cheesecake, each year Demarest bakes holiday rolls, pies, and more cookies than she could probably count, to bundle into boxes as gifts. “It’s the best time of year to be baking,” she says happily.
The Recipe: Double-Chocolate Peppermint Cheesecake
Serves 8-10
For the crust:
2 cups chocolate cookie crumbs, finely ground
2.5 ounces butter, melted
For the filling:
20 ounces cream cheese, room temperature (Demarest recommends Gina Marie brand)
1/4 cup sugar
2 eggs
1 egg yolk
6 ounces white chocolate, melted
1/2 cup plus 2 tbsp. sour cream
1/8 tsp. food-grade peppermint oil (see note)
3 tsp. crushed peppermint candies (candy canes or round starlight mints)
pinch of salt
For the topping:
4 ounces bittersweet chocolate, chopped
3 ounces butter
1/2 tbsp. corn syrup
1 tbsp. water
1/2 cup crushed peppermint candies
In a small bowl, combine the chocolate cookie crumbs and melted butter and mix until butter is evenly distributed.
Press into the bottom of a greased 10-inch springform pan. Use a measuring cup to press and smooth evenly. Bake for 10 minutes at 350 degrees, then remove from oven and cool.
Crush the peppermint candies using a mortar and pestle, or place them in a plastic bag, seal it, and use a rolling pin to gently break them apart.
To prepare the filling, melt the white chocolate gently over a double boiler.
Stir until smooth, then remove from heat and set aside.
In a mixer with paddle attachment, mix the cream cheese, sugar and salt until smooth, scraping down the sides and paddle to prevent any lumps. Beat in the eggs and egg yolk, then all of the sour cream, and finally, the melted white chocolate.
Add the peppermint oil and crushed peppermint candies and mix them into the filling by hand. Make sure the latch on the springform pan is tightened, then pour the filling over the cooled crust.
Wrap the springform pan in two layers of aluminum foil. Make a water bath by putting the wrapped pan inside a larger pan and fill with 1 inch of water.
Bake in a water bath at 350 degrees for 45-50 minutes until the cake is just set at the center.
Remove the cake from the oven, unwrap the foil, and cool the cheesecake on a wire rack. Refrigerate until firm or overnight.
Prepare the ganache topping. Melt the chocolate, butter, corn syrup and water over a double boiler and whisk until smooth. While the cake is still in the springform pan, pour the ganache on top, tilting the pan to cover the cake evenly to the edges.
Sprinkle crushed peppermint candies over the top of the cake and return it to the refrigerator to chill until the top is set. To serve, release the cake from the springform pan, slice and garnish with additional peppermint candies.
Note: Food-grade peppermint oil is available at most supermarkets or at bakery supply shops. It is highly concentrated, so you will need just a small amount.
Baker & Cook, 18812 Highway 12, Sonoma. 707-938-7329, bakerandcooksonoma.com
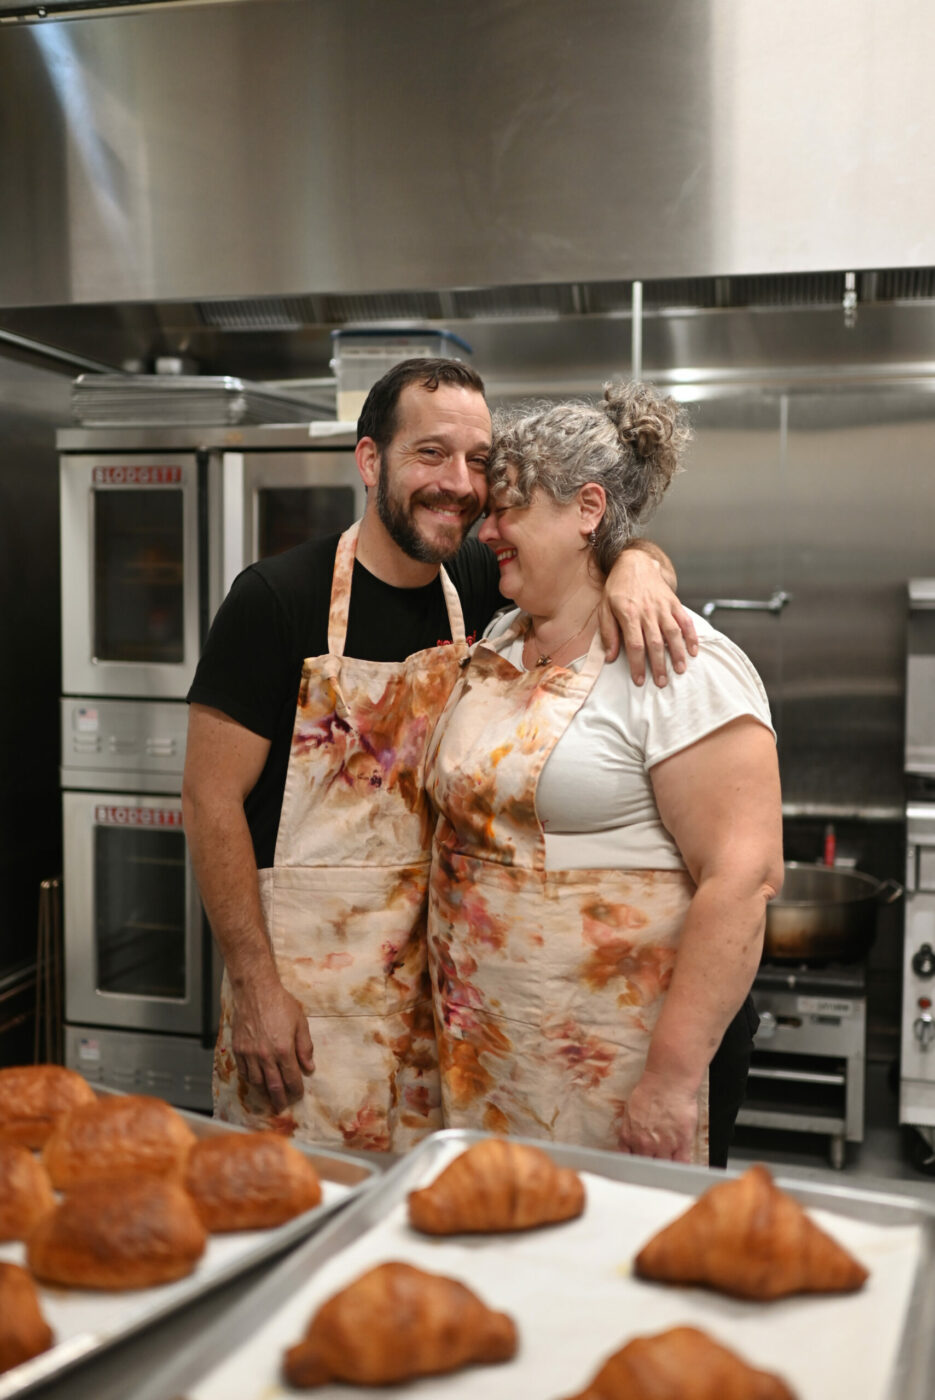
The Chefs: Amy Brown and Joe Wolf, Marla Bakery
“My baking obsession really began because I needed to stay warm,” laughs Amy Brown of Marla Bakery. After college, Brown spent a year in Italy — but the winter clothes she had shipped ahead didn’t arrive in time for colder weather. So Brown, who was working at a bakery at the time, spent many wintry hours staying warm by the ovens and falling in love with the scene.
She and her husband and business partner, Joe Wolf, recently welcomed their many Marla fans to a new café in Railroad Square, after three years of serving pastries, cakes and bagels out of their Windsor production facility.
The couple, who have two young sons, are a family of mixed religious heritage and spend the December holidays making sufganiyot for Hanukkah alongside traditional Christmas goodies like panettone, stollen and biscotti.
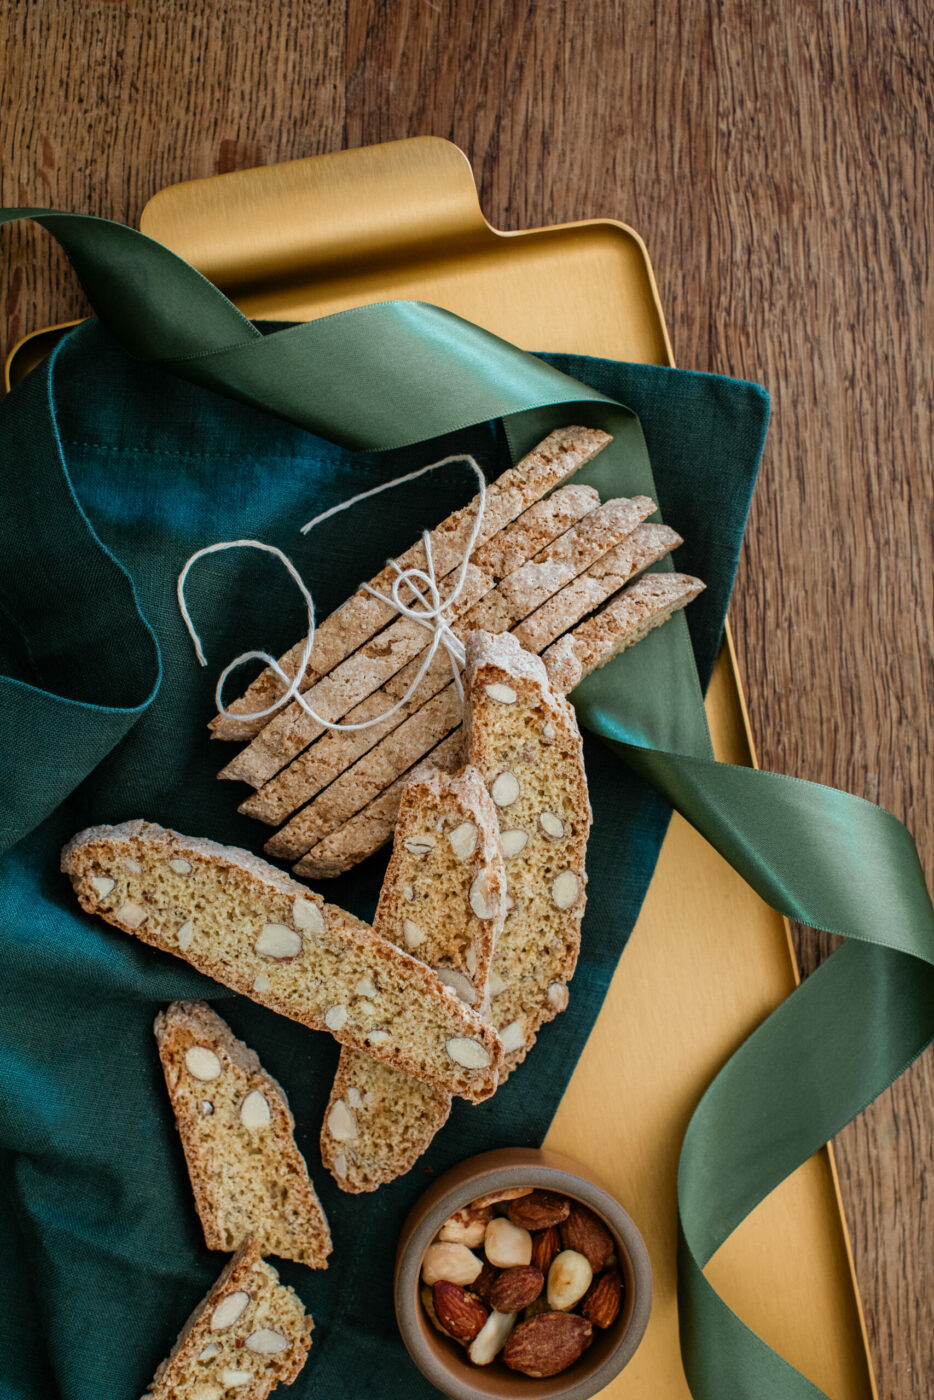
Flavored delicately with orange and anise, Brown says her biscotti are a humble little cookie that come from the heart and have a warm, comforting aroma. She’s been making them for over three decades, ever since she learned the recipe from her college roommate, who had learned it from an elderly Italian woman she cared for. “It’s recipes that carry the past into the present,” says Brown. “That’s kind of what we’re all about, and this recipe speaks to that.”
The Recipe: Orange & Anise Biscotti
Makes 2 dozen
2 ½ cups, plus 2 tbsp. organic all-purpose flour
1 ¼ cups organic sugar
1 tsp. baking powder
1/2 tsp. salt
1 tsp. anise seed, finely chopped (not ground)
1 ½ cups raw almonds, skin on, or raw, skinned hazelnuts, roughly chopped
3 eggs
2 egg yolks
1 tsp. vanilla extract
zest of 2 oranges
extra flour for dusting
Preheat oven to 325 degrees and line a standard-sized baking sheet with parchment paper. Combine flour, sugar, baking powder, salt, anise seed and nuts in a large bowl. Stir until thoroughly combined and set aside. Whisk together eggs, egg yolks and vanilla extract in a small bowl, using a rubber spatula to stir in the orange zest at the end.
Pour the wet ingredients into the dry ingredients and stir with a spatula until the mixture is just combined. It will start out feeling dry, but resist the urge to add liquid. As the sugar “melts,” the mixture will loosen. Once combined, the mixture will be fairly wet and sticky.
There is no getting around it, this next step is the messy part. Don’t be afraid of some sticky, doughy hands — your hands can be washed. Generously dust a work surface with flour and place your lined baking sheet nearby. With your hands, scoop out half of the mixture and quickly roll it into a log nearly the length of your sheet pan and about 2 ½-3 inches in diameter. If your log is sticking to the work surface, dust with more flour, but try not to over-flour as it will make the biscotti tougher. Gently but quickly scoop up the log with both hands and transfer to the baking sheet, placing it long ways on one side.
Re-flour the work surface, scoop out the remaining dough, and repeat the rolling to form another log. These will spread out, so allow enough space between the two logs and the edges of the baking sheet. If you are worried, use two baking sheets, one for each log.
Bake at 325 degrees for 30-35 minutes until deep golden brown and no longer soft in the middle. Pull out and allow to cool slightly before cutting, about 15-20 minutes.
Lower oven temperature to 250 degrees.
To cut biscotti, transfer each log to a cutting board while still warm. With a serrated knife, gently slice at a 45-degree angle into about 1/3-inch-thick cookies.
Set a wire cooling rack on each sheet pan and arrange the cookies loosely on the rack. Return the cookies to the oven and bake at 250 degrees for another 30-40 minutes until crisped through, flipping them over halfway through baking. Cool completely and store in an airtight container for up to two weeks.
Marla Bakery, 208 Davis St., Santa Rosa. 707-852-4091, marlabakery.com

The Chefs: Warren and Bobbi Burton, BurtoNZ Bakery
The tail end of the name of Warren and Bobbi Burton’s bakery, BurtoNZ, is a nod to Warren’s roots in coastal Hawke’s Bay, on New Zealand’s North Island. With pastry cases filled with meat pies, sausage rolls and lamingtons, the couple’s bakery has become a welcome taste of home for Kiwi and Aussie expats.
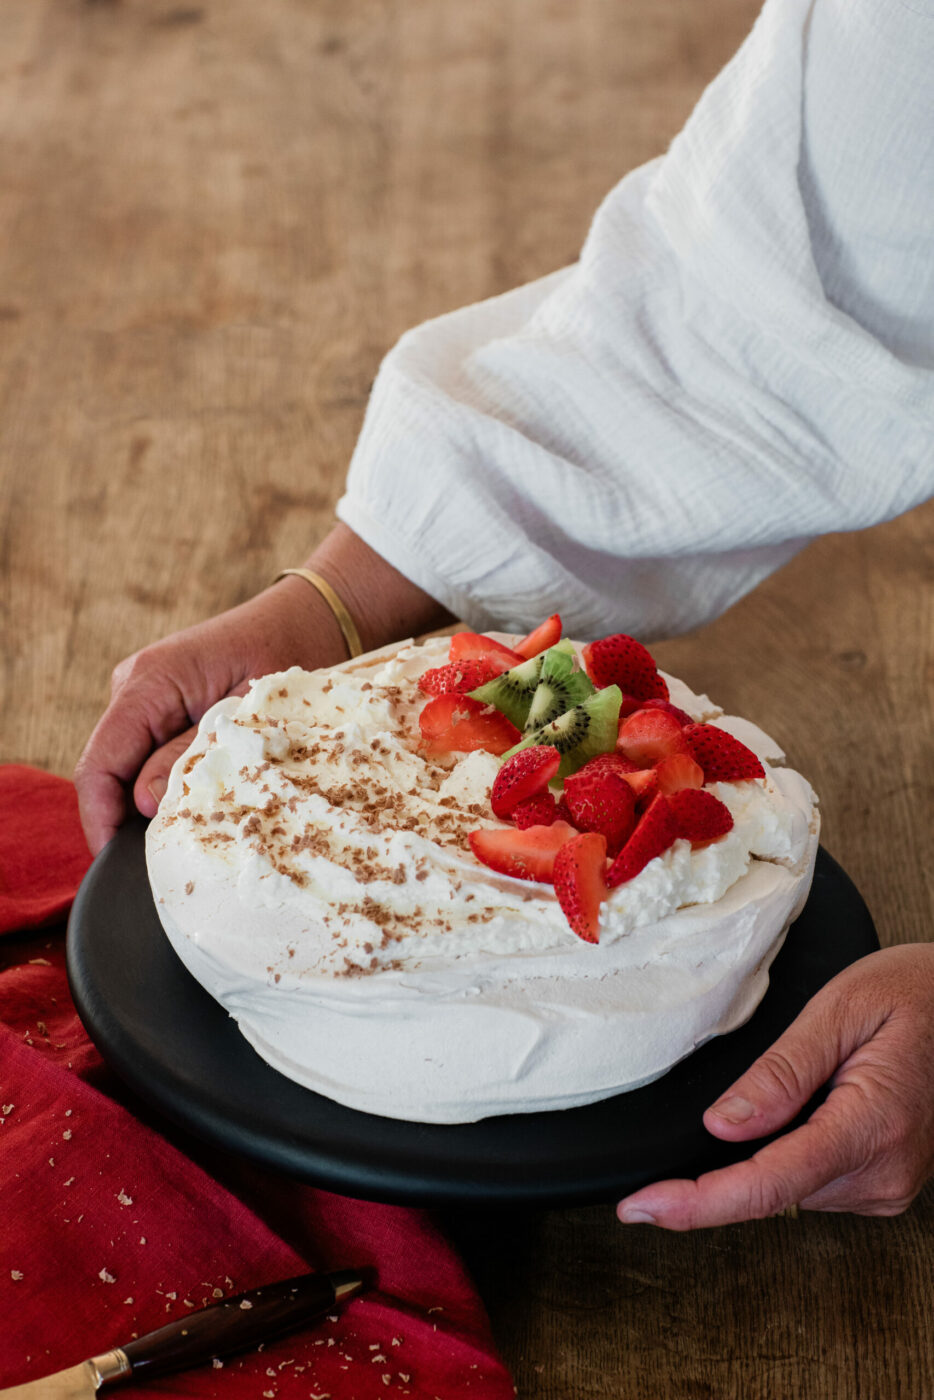
At Christmastime, when Northern Hemisphere folks might enjoy hot cocoa by the fireplace, the Burtons dream of warm weather and lighter fare. Growing up, after a big Christmas Day lunch, Warren says his family would go to the beach or the river to cool off before heading home to tuck into pavlova, a large meringue topped with fruit and whipped cream.
“It’s literally my favorite dessert to eat. I think just the flavor of a ripe kiwifruit, the ripe strawberry, with the cream and crunch of the meringue, it’s just familiar,” says Warren, adding that a truly authentic pavlova includes shavings of Cadbury chocolate.
While pavlova requires just a few simple ingredients, Warren and Bobbi have a few tips to make sure the middle of the meringue doesn’t cave in. One is to use the freshest eggs possible — the couple source theirs from nearby Wise Acre Farm. The other is to make sure the egg whites and sugar are whipped up extra thick and glossy, says Warren. “The secret I’ve found is when I think that it’s whipped enough, I give it another minute for good luck.”
The Recipe: New Zealand-Style Pavlova
Serves six
For the meringue:
4 egg whites
1 ¼ cup sugar
1 tsp. white vinegar
1 tsp. vanilla extract
1 tbsp. cornstarch
For the topping:
2 cups whipped cream
1 small square Cadbury milk chocolate, grated
Fresh strawberries and kiwifruit, sliced
Preheat oven to 350 degrees. Using an electric mixer, beat egg whites and sugar for 10 minutes or until thick and glossy. In a separate bowl, mix together the vinegar, vanilla extract and cornstarch, then add to the egg whites. Beat on high speed for five additional minutes.
Line a baking tray with parchment paper. Draw a 9-inch-diameter circle on the baking paper. Spread the egg white mixture on the paper, to within an inch of the edge of the circle. Smooth the top surface.
Place into the oven and lower the temperature to 210 degrees. Bake for 1 hour, then turn the oven off, crack open the oven door, and allow the pavlova to fully cool in the oven.
Remove from parchment and place on a serving platter. Top with whipped cream, decorate with fruit and grated Cadbury chocolate, and serve right away.
BurtonNZ Bakery, 9076 Brooks Road S., Windsor. 707-687-5455, burtonzbakery.com
The Chef: Cita Vivas, Cita’s Kitchen
Cita Vivas is passionate about sharing the culture of her native Colombia through food. She launched her pop-up, Cita’s Kitchen, in 2022 after years in the kitchen at Willi’s Wine Bar and Stark’s, serving homemade empanadas and arepas at local farmers markets and breweries.
Though it’s been 25 years since Vivas moved to California, she still gets nostalgic for the holidays of her childhood. “Christmas is the biggest holiday we celebrate. In Colombia, at Christmas, we are very loud,” she says. The festive season lasts throughout December as families make homemade nativities and ornaments and pay nightly visits to friends’ homes, where children sing and take turns reading Christmas stories.
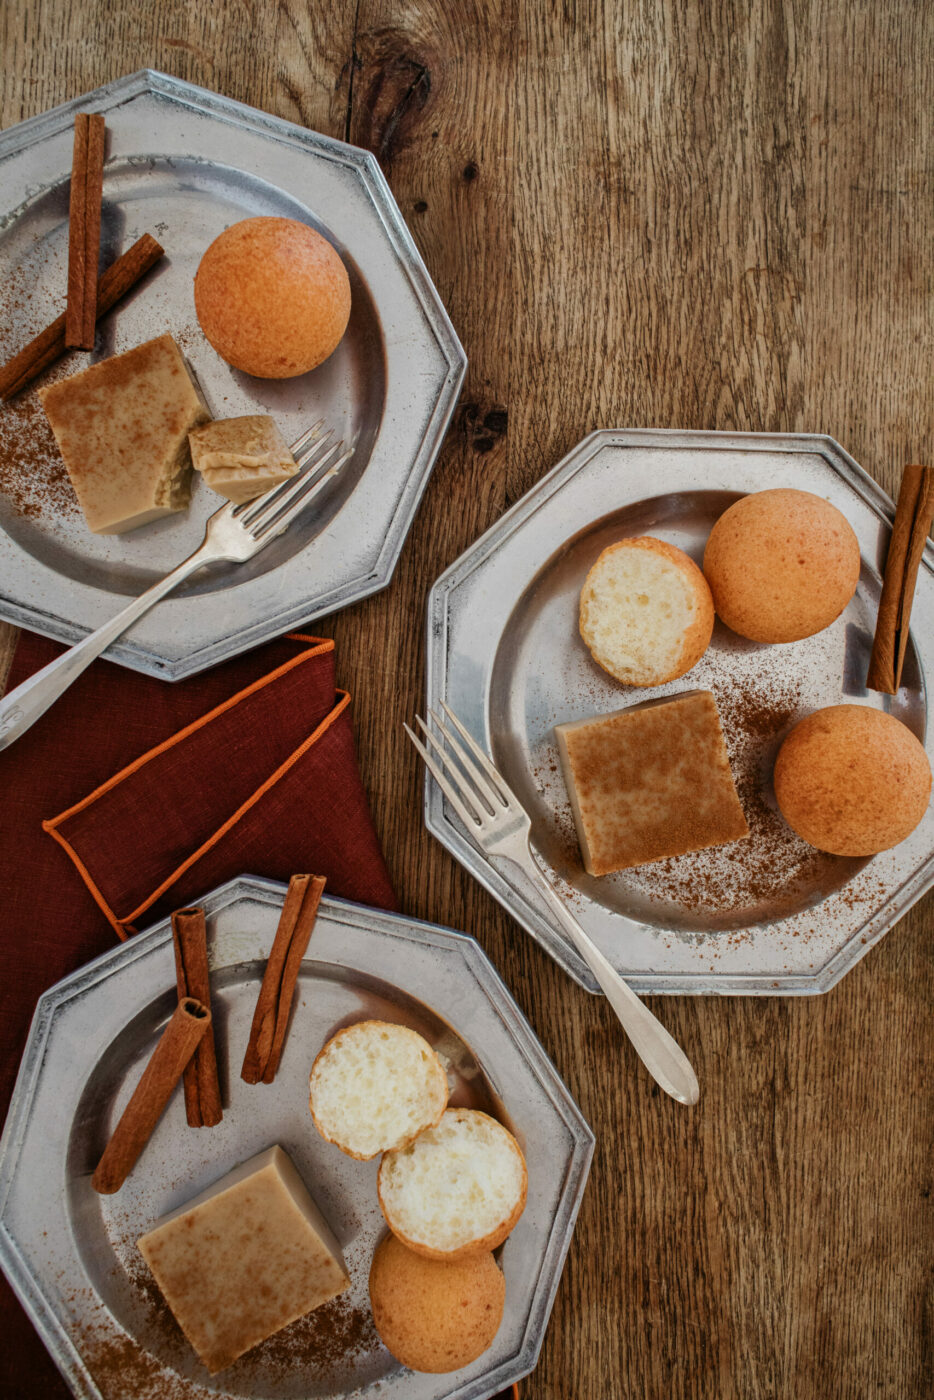
Afterwards, everyone enjoys a treat of buñuelos, traditional round, golden fritters filled with cheese. Buñuelos are an everyday food in Colombia, but they become festive fare at the holidays when paired with natilla, a sweet, Jello-like custard made with cinnamon and sometimes shredded coconut or raisins. It’s a salty-sweet combination Colombians adore.
“Natilla is authentically Colombian,” says Vivas. “I don’t find anything like that anywhere else. Everybody does it in a different way. You can put in coconut, raisins — or you can just do them with cinnamon, and it will be just as delicious.”
The Recipe: Colombian-Style Buñuelos with Natilla
Serves 12
For the Natilla (make one day ahead):
4 cups whole milk
3/4 cup cornstarch (maizena)
1 ¼ cups panela (sugar cane), grated
2 ½ tbsp. butter, softened
1 cinnamon stick
3 tbsp. red raisins or shredded coconut (optional)
In a medium bowl, add 2 cups of the milk and the cornstarch and stir with a spoon to dissolve, making sure there are no lumps. Pour the remainder of the milk into a large saucepan, add the cinnamon stick, and on a stove, slowly bring the mixture to a gentle boil over medium heat. Add the grated panela and stir until fully dissolved.
Remove the cinnamon stick. Add the cornstarch-milk mixture to the pan, lower the heat to medium-low, and continue to stir for about 10-15 minutes. Do not allow the milk to burn. Add the butter and continue stirring for approximately five more minutes until the butter is incorporated. Stir in the raisins or coconut, if using. Remove from heat and pour the mixture into an 8-inch-square pan or shaped mold of your choice. Cover with a kitchen towel and allow to set at room temperature for 30 minutes, then transfer to the refrigerator and cool for a minimum of six hours or overnight.
For the Buñuelos:
3/4 cup cornstarch
1/4 cup yucca flour
1/4 tsp. salt
2 tbsp. sugar
1 cup cotija cheese
2 eggs
1 ½ tbsp. milk
1/2 tsp. baking powder
1 quart vegetable oil, for frying
Powdered cinnamon, for serving
In a large bowl, mix cornstarch, yucca flour, salt, sugar and cotija cheese until well combined and free from lumps.
Make a well in the center of the dry ingredients and add the eggs and milk.
With your hands, mix well until a soft dough forms. Fold in the baking powder and let the dough rest for 10 minutes.
After resting, form the dough into 12 equal balls, each about the size of a golf ball.
In a medium pot, add vegetable oil to a depth of about 2 ½ inches, and heat the oil to 325 degrees. Test that the oil is the right temperature for frying by making a ball of dough the size of a small marble and placing it in the oil. It should rise and float in about 10 seconds if the oil is the right temperature. (If the ball rises too soon, the oil is too hot. If it stays at the bottom or rises late, the oil isn’t hot enough.) Fry the buñuelos in batches, a few at a time, for 8-10 minutes until golden. As each batch finishes, drain on paper towels to absorb any excess oil.
Serve hot, with a square of natilla and a sprinkle of powdered cinnamon.
Note: Panela (sugar cane or piloncillo) and yucca flour (maizena) are available at most Latino markets.
Cita’s Kitchen in Santa Rosa. On Instagram @citas.kitchen.llc